
WordPress Permalinks Keep Breaking
We have a WordPress Multisite installation for a growing WooCommerce store, and in the build up to a busy period, our permalinks kept breaking. This was initially a simple fix each time, hitting “Save” in the WordPress Dashboard > Permalinks page.
Eventually, this stopped working and only a reset of the server worked. Make sure you have a Static IP assigned to your virtual instance before resetting.
WordPress Establishing Database Connection, phpMyAdmin #2002 error
Then later, this stopped working as a fix too. The error became a more serious error: “Error establishing database connection”.
After SSHing into the server, we were unable to connect to MySQL, and the phpMyAdmin that comes with Google Cloud Compute Engine VM Instance wouldn’t let us login, giving us a #2002 error, or not letting us login at all. Uh-oh. The problem turned out to be WordPress Multisite MySQL running out of space on our Google Cloud Compute Engine VM Instance.
After SSH’ing into the server, using the command:
df –h
we were able to see that /dev/sda1 was at capacity, which was causing MySQL to crash.
A quick fix was to:
- Create an image of the Compute Engine VM Instance with WordPress multisite on
- Create a new disk with more storage from the image
- Check you have a static IP (not ephemeral) enabled on the Instance from GCP Console > VPC Network > External IP addresses
- Stop the VM Instance
- Assign the new disk with more space as the boot disk in the VM Instance settings
- Start the VM Instance
A better way to have avoided this would to have used a separate Cloud SQL database for the Multisite instance. In summary, to upgrade your Click-to-Deploy-WordPress instance to have a separate Cloud SQL database, follow these steps:
- Export your SQL file from phpMyAdmin. phpMyAdmin is accessed through yourdomain.com/phpmyadmin. Root password is in your VM Instance Metadata.
- Upload the SQL file to a bucket in GCP Console > Storage
- Create a Cloud SQL MySQL instance in GCP. I host the database in the same region as the VM Instance to improve speed. Enable a Private IP and disable Public IP access on the SQL instance.
- Import your SQL file from the bucket to a database in the Cloud SQL instance on the Cloud SQL > Database name overview page
- Create a new user with a password to be able to access the database
- Update your wp-config.php file with the new private IP as the hostname and new username/password. The schema (or WordPress database name) should be the same but worth checking.
Regular Snapshots of the VM Instance and scheduled backups of the database will aid recovery efforts in the future.
Other errors we encountered (solutions below):
- Certbot issues — Apache2 not starting
- Accessing a GCP Cloud SQL with a GUI
- WordPress permissions errors when uploading files or updating plugins on a VM Instance
Moving WordPress Multisite and Fixing Basic Errors
WordPress Redirecting to Signup Page
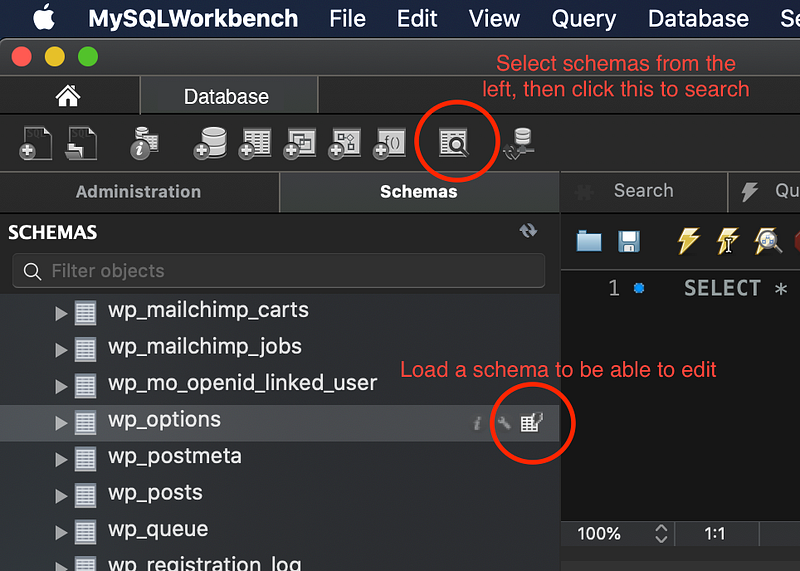
There were still references to the old domain in the database. Keep checking and searching, as it can be referenced in a few places and by caching or SEO plugins. As a new user of MySQL Workbench (see details of how to connect below) this took me a while to work out how to use the search icon from the top menu, enter my search, then go and apply changes I made to update to the new domain.
Installing Multiple Certbot SSL Certificates
The WordPress MU Domain Mapping plugin is a must-have for WordPress Multisite installations. After installing Certbot SSL certificates, update the domain in the wp_options and wp_2_options tables with the new https://domainname format. This example is for a multisite with 2 installations.
I added an SSL certificate with Certbot (full instructions here), using the format:
sudo certbot --apache
Later when I added more domains with Certbot, I used commands such as
sudo certbot delete
sudo certbot certificates
sudo certbot --apache -d domain.com -d sub.domain.com -d differentdomain.com
Apache2 not starting after Certbot SSL change
Errors included Apache2 not starting (000-default-ssl-le.conf not updating).
Sudo certbot delete to remove old certificates, sudo cerbot certificates to check what’s installed, and -d to reference other domains when creating new certificates. To solve the apache2 not starting error, which was discovered using
sudo service apache2 restart
and then
sudo journalctl -xn
to find more specific error. I edited /etc/apache2/sites-enabled/000-default-ssl-le.conf to make sure the SSL referenced was using the correct certificate file with all of the domains in.
Very brief overview of editing text files in bash: I used cd to navigate to the folder, then “sudo nano filename”, edited the file to change which SSL certificate to use, then Ctrl + x to save and quit.
cd /etc/apache2/sites-enabled/
sudo nano 000-default-ssl-le.conf
Good practice would be to duplicate and rename the file first as a backup.
Permission Errors When Uploading Files or Updating Plugins on the Google Cloud VM Instance
When working with a new WordPress installation on Google Cloud Platform, you will have to adjust file permissions to give WordPress the ability to upload and modify files like themes and plugins. A quick fix:
You will need to change the ownership of your web files so www-data can access them. This command changes ownership:
sudo chown -R www-data:www-data /var/www/html
You may want to harden your WordPress installation by removing permissions when you have installed all the plugins you need.
Accessing Google Cloud SQL on Mac, using SSH Tunnelling to Access Cloud SQL Instance with Private IP
After installing SSL certificates for WordPress Multisite with Certbot, or moving the WordPress installation between new VM Instances, I had to update the URLs in the MySQL database. This was done by SSH Tunnelling and a GUI SQL client.
Generally, I used Core Tunnel on the Mac App Store, and MySQL Workbench 8.0.21 (I didn’t use the latest version as the MySQL Workbench latest version kept crashing on my MacBook). A prerequisite was having SSH set up with a private key on my laptop to be able to access GCP VM Instances.
These were generated on my MacBook and the public key uploaded to GCP Compute Engine > Settings Metadata. I then use the private key file with either my SFTP Client (I use Transmit by Panic) or Core Tunnel for SSH tunnelling.
I used Core Tunnel on our Google Cloud SQL database that had a Private IP, as there was no way to directly access from my home laptop (you would need a Public IP on the database for that). Core Tunnel let me access the Cloud SQL instance from SSH’ing to the VM Instance. Core Tunnel on Mac looks a bit like this:
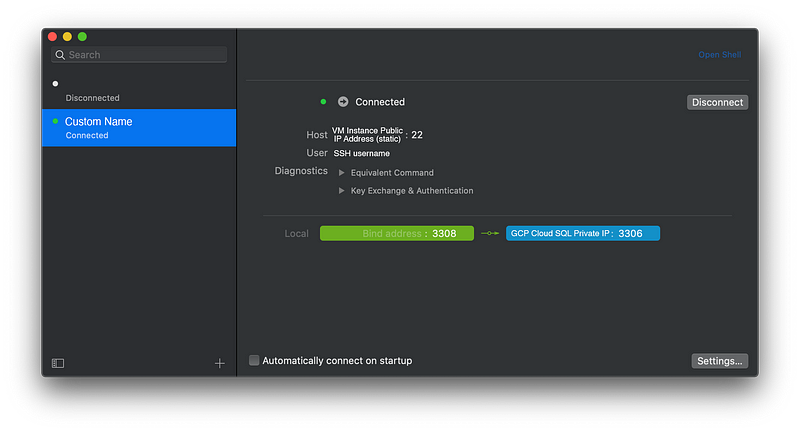
When Core Tunnel was connected, I could load Workbench with the database details using localhost:3308 (3308 matches Core Tunnel above) as the host and a database username and password that I had set up in GCP Console > Cloud SQL. In Workbench some simple tools helped find wp_options, wp_sites, wp_blog in the database and then adjust the URLs. Clicking Apply uploaded them to the SQL instance.
And that’s it!